| TABLE OF CONTENTS - DESIGNER FOLDERS AND CARDS |
| Topics in this Section: |
| OVERVIEW: How it Works - Editing vs. Printing |
| GETTING STARTED: Add New - Editing - Deleting - Renaming - Recategorizing |
| MAKING CHANGES (WORKING WITH YOUR CARDS): Mortware Toolbar - |
| ADVANCED TIPS: Working with Poems or Prayers - |
| INTRODUCTION |
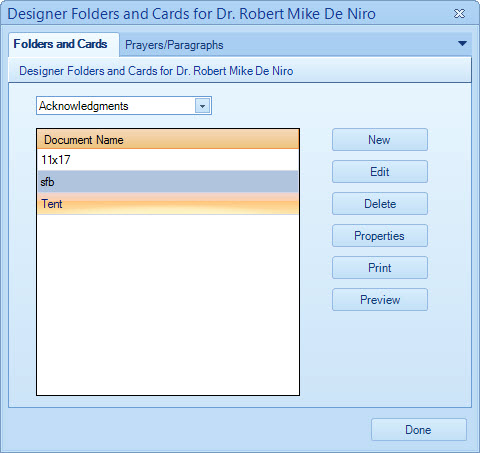
| To Get To This Screen: Simply go to the Setup menu and select Designer Folders and Cards. |
 |
| Figure A |
| OVERVIEW |
| How it Works: |
Similar to User-Defined Documents, folders and cards work directly with Microsoft Word to create desirable printouts. With this part of the program, you can create a folder or card that can dynamically change depending on the funeral case you are printing the card out for. In order to make parts of your card dynamic, Mortware uses items called "Merge Codes". These merge codes are simply items that tell the Mortware program what information you want on your card. |
| Editing vs. Printing: |
There are two separate areas in the Mortware program which deal with Designer Folders and Cards and it is important to keep them separate. One area is found under the Setup > Designer Folders and Cards menu at the top of the program. The second area is found under the
Forms > Designer Folders and Cards menu. The FORMS area is intended for simply printing out a folder or card that has already been setup and designed. This means that when you print the card from the forms menu, the card will print with the specific case information from the current case you have selected. Any card designs that have been made will appear in the list here for you to choose from. |
| GETTING STARTED (SETUP) |
 |
| Figure B |
| How to Add a New Document: |
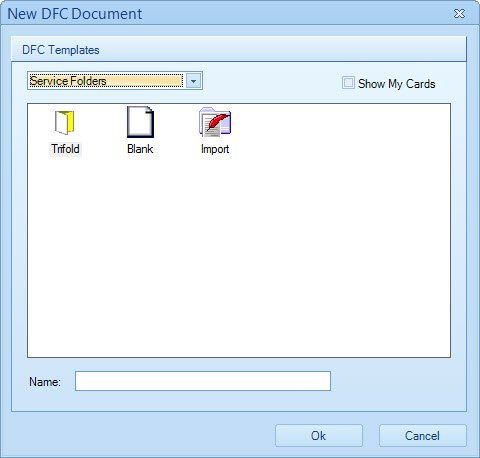
| 1) From the Designer Folders And Cards window click the New button. This will bring up the New DFC Document window as seen as Figure B above. |
| 2) In the New DFC Document window, choose the type of document you'd like to create from the drop-down box at the top of the window. |
| 3) Choose from the options of Blank, Import, etc in the icon window. Use Blank for creating a card document from scratch. Use Import to import a card document that is already created. |
| 4) Type in a name for your document in the Name field at the bottom of the window. |
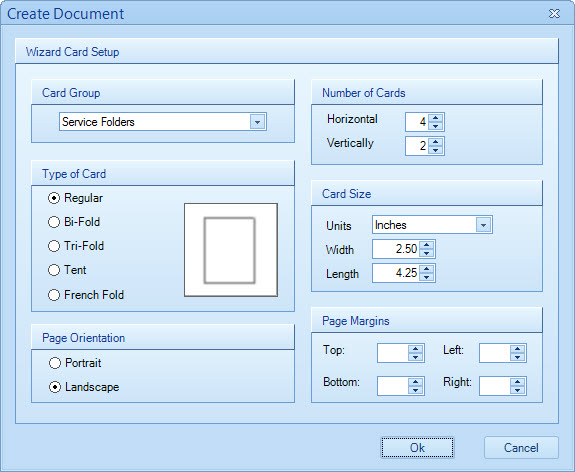
| 5) Click the OK button to continue. (Continued below Figure C) |
 |
| Figure C |
| (...Continued from above Figure C) |
| 6) In the Create Document window, pick from the Type of Card for the folding style. |
| 7) Next, choose a Page Orientation. |
| 8) Next, set the Number of Cards per page. Horizontal is cards across the page, Vertical is cards down the page. |
| 9) Next, set the Card Size for each card or section. |
| 10) Next, set the Page Margins if you wish to add space around the entire document. |
| 11) Click the OK button to finish the new card document. |
| 12) The new document will now be listed alphabetically under its category on the Designer Folders and Cards window. (As seen in Figure A above) |
| Editing an Existing Document: |
| 1) Starting at the Designer Folders and Cards screen (Figure A), click once to highlight a card document you wish to edit. |
| 2) Once highlighted, click the Edit button. This will open up a Microsoft Word window with your card document. |
| 3) Proceed with editing merge codes, text, poems, etc. |
| 4) Once done your changes, exit Microsoft Word. |
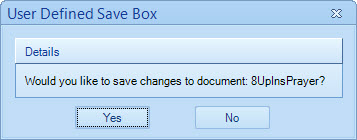
| 5) When Word closes, you'll see a User Defined Save Box window (See Figure D below). Click the Yes button to save your changes back into Mortware. |
 |
| Figure D |
| Deleting a Card Document: |
| 1) Starting at the Designer Folders and Cards screen (Figure A), click once to highlight a card document you wish to delete. |
| 2) Once highlighted, click the Delete button. |
| 3) Click Yes on the Confirm Deletion window. |
| Renaming a Card Document: |
| 1) Starting at the Designer Folders and Cards screen (Figure A), click once to highlight a card document you wish to rename. |
| 2) Once highlighted, click the Properties button. |
| 3) Type in a New Name for the card. |
| 4) Click the Save button. |
| Recategorizing a Card Document: |
| 1) Starting at the Designer Folders and Cards screen (Figure A), click once to highlight a card document you wish to recategorize. |
| 2) Once highlighted, click the Properties button. |
| 3) Choose a new Category for the document. |
| 4) Click the Save button. |
| MAKING CHANGES (WORKING WITH YOUR CARDS) |
| Mortware Toolbar |
|
| ADVANCED TECHNIQUES |
| Working with Poems or Prayers: |
| If you wish to design a card with a poem or prayer on it that will constantly change according to the case selected, use the @PRAYER@ merge code. By using this code, the program will know to prompt the user to select a poem or prayer during the print or preview process. Note that with this method, however, the prayer will not automatically resize like it would if you added a particular prayer right in the setup mode for the card. |
| In order to use the program's ability to automatically resize a poem or prayer to fit a card, it is important to understand how it works. In order for Mortware to fit the poem or prayer to the biggest possible size, you will want to first make sure there is no extra spaces on the card. That is, remove any extra lines where you may have hit the enter key to push text down. With the spaces removed, insert the prayer or poem, and Mortware will then expand to fit the area. You may then add spaces afterward if needed. |
