TABLE OF CONTENTS - GENERAL PRICE LIST
Topics in this Section:
- CHARGES
- CASH ADVANCES
- DISCOUNTS
- PACKAGES
-
GPL PRINTING
- Add, Edit, Delete
- GPL DATES
- TASKS
FUNERAL CHARGES (TAB)
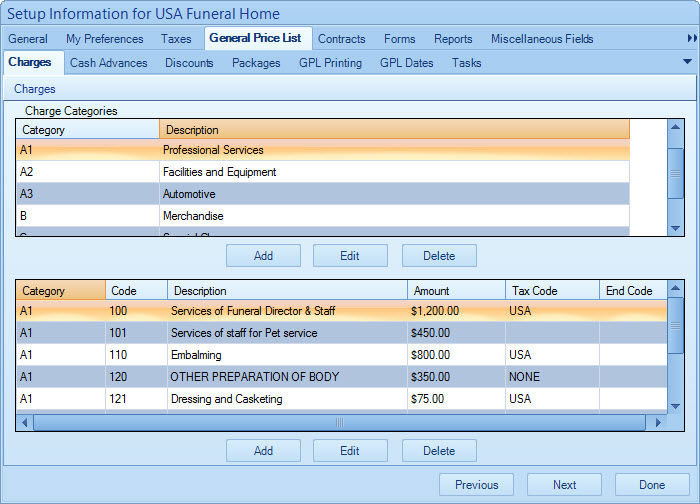
Charge Categories - Each category added in the top grid may have multiple master charges inside of it.
Master Charges - Master charges are simply individual charge items the funeral home or cemetery may include on an invoice.
Categories and Codes Explained - In U.S. funeral service contracts, many styles require charges, merchandise and cash advances to be grouped in certain sections of the document. The category and code scheme seen in the picture above is the typical setup of popular contract schemes such as Peach Tree, Federated, and BSSI.
Add New Charge Category:
1) Click the Add button below the Charge Categories grid.
2) Enter a Category for the new category you're adding. This typically functions as a sort of code name, not the full name.
3) Enter a Description for the new category (Description is the displayed name of the category for forms).
4) Enter a Sort Order Num if you wish this category to sort in a particular order. The number is ordered relative to other category numbers. This field is optional.
5) Choose Merchandise Category if you wish for this category to be grouped under the merchandise section of invoices and forms. Typically this option is used for small merchandise such as register books, prayer cards, etc. This field is optional.
6) Click the OK button to add the category.
Edit Charge Category:
1) Click the Edit button below the Charge Categories grid.
2) Change the Category field, the Description field, the Sort Order Num field or the Merchandise Category field as desired. Please note that it is not recommended to change the Category field for a category if you already have Master Charges within the category. Doing so will alienate the master charges and they will not be editable. Instead, create a new category, then edit each charge, change its category to the newly created category, then delete the now empty old category.
3) Click the OK button to save your changes.
Delete Charge Category:
Please note that it is not recommended to delete a category that has master charges associated with it, as doing so will alienate the items and they will not be editable. Delete all master charge items within the category first, then proceed with deleting the category.
1) Left-Click once to highlight a category in the Charge Categories grid.
2) Click the Delete button below the Charge Categories grid.
3) Click the Yes button to confirm the delete.
Add New Master Charge:
1) Click the Add button below the Master Charges grid.
2) Choose a Categoryto associate your new charge to.
3) Enter a Code number (may be letters too) for the charge. See an example pricelist outline for help on choosing a code.
4) Enter an Amount for the charge. This amount is usually set to the typical price for the charge (or base price).
5) Choose a Tax Code for the item. Again this is the tax code that is default for this charge. It can be edited on a case-by-case basis later once attached to a case.
6) Place a check in the Put In Additional Items List option if you would like this charge to be able to be added a la carte to a funeral (as opposed to being a package only charge). By default it is turned on (Recommended).
7) Place a check in the Include on General Price List option if you would like this charge to appear as part of the general price list when printed out on paper. By default it is turned on (Recommended).
8) Place a check in the Print on Contract for All Funerals option if you would like this charge to appear on a formal contract for all cases even if it is a zero amount for the case.
9) Type a Price List Description / Disclosure if you need to explain the charge (often used for a price list printout).
10) Click the OK button to add the charge.
Edit Master Charge:
Please note that you should not change the category or code of a charge if it has already been attached to a package. The program will not be able to update the packages automatically. Therefore you will have to edit the packages manually to include your newly categorized or coded charge.
1) Click the Edit button below the Master Charges grid.
2) Change the fields that you wish to alter.
3) Click the OK button to save your changes.
4) On the Mortware GPL window, click the Yes button to cascade your changes into all packages that include this charge automatically, click the No button if you would like to leave packages untouched.
Delete Master Charge:
Please note that deleting a master charge will not remove it from packages that contain the item.
1) Left-Click once on the Master Charge that you wish to delete.
2) Click the Delete button below the Master Charges grid.
3) Click Yes to confirm the delete.
CASH ADVANCES (TAB)
Cash Advances may also be known as Cash Disbursements.
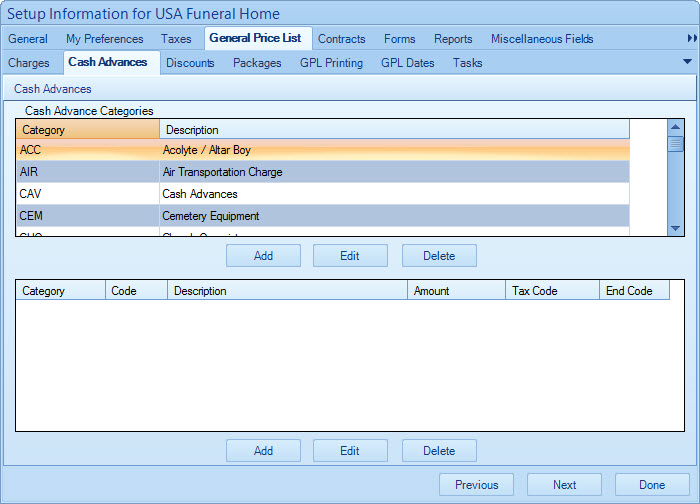
Cash Advance Categories - Each category added in the top grid may have multiple master cash advances inside of it.
Master Charges - Master cash advances are simply individual advance items the funeral home or cemetery may offer in an invoice.
Add New Cash Advance Category:
1) Click the Add button below the Cash Advance Categories grid.
2) Enter a Category for the new category you're adding. Typically it is only necessary to have one generic category such as "CASADV" for all cash advances as pictured above.
3) Enter a Description for the new category (Description is the displayed name of the category for forms).
4) Enter a Sort Order Num if you wish this category to sort in a particular order. The number is ordered relative to other category numbers. This field is optional.
5) Choose Merchandise Category if you wish for this category to be grouped under the merchandise section of invoices and forms. Typically this option is used for small merchandise Charges such as register books, prayer cards, etc., it is not recommended for cash advance items.
6) Click the OK button to add the category.
Edit Cash Advance Category:
1) Click the Edit button below the Cash Advance Categories grid.
2) Change the Category field, the Description field, the Sort Order Num field or the Merchandise Category field as desired. Please note that it is not recommended to change the Category field for a category if you already have Master Cash Advances within the category. Doing so will alienate the master cash advances and they will not be editable. Instead, create a new category, then edit each advance, change its category to the newly created category, then delete the now empty old category.
3) Click the OK button to save your changes.
Delete Charge Category:
Please note that it is not recommended to delete a category that has master cash advances associated with it, as doing so will alienate the items and they will not be editable. Delete all master cash advance items within the category first, then proceed with deleting the category.
1) Left-Click once to highlight a category in the Cash Advance Categories grid.
2) Click the Delete button below the Cash Advance Categories grid.
3) Click the Yes button to confirm the delete.
Add New Master Cash Advance:
1) Click the Add button below the Master Cash Advances grid.
2) Choose a Category to associate your new advance to.
3) Enter a Code number (may be letters too) for the advance. Usually a three-letter abbreviation is used.
4) Enter an Amount for the cash advance. This amount is usually set to the typical price for the advance (or base price). Simply leave the amount at 0.00 if the price is always different.
5) Choose a Tax Code for the item. This is the default tax that is applied to the cash advance. It can be edited on a case-by-case basis later once attached to a case.
6) Place a check in the Put In Additional Items List option if you would like this advance to be able to be added 'a la carte' to a funeral (as opposed to being a package only advance). By default it is turned on (Recommended).
7) Place a check in the Include on General Price List option if you would like this cash advance to appear as part of the general price list when printed out on paper. By default it is turned on (Recommended).
8) Place a check in the Print on Contract for All Funerals option if you would like this cash advance to appear on a formal contract for all cases even if it is a zero amount for the case.
9) Type a Price List Description / Disclosure if you need to explain the cash advance (often used for a price list printout).
10) Click the OK button to add the cash advance.
Edit Master Charge:
Please note that you should not change the category or code of a cash advance if it has already been attached to a package. The program will not be able to update the packages automatically. Therefore you will have to edit the packages manually to include your newly categorized or coded cash advance.
1) Click the Edit button below the Master Cash Advances grid.
2) Change the fields that you wish to alter.
3) Click the OK button to save your changes.
4) On the Mortware GPL window, click the Yes button to cascade your changes into all packages that include this cash advance automatically, click the No button if you would like to leave packages untouched.
Delete Master Charge:
Please note that deleting a master cash advance will not remove it from packages that contain the item.
1) Left-Click once on the Master Cash Advance that you wish to delete.
2) Click the Delete button below the Master Cash Advances grid.
3) Click Yes to confirm the delete.
DISCOUNTS (TAB)
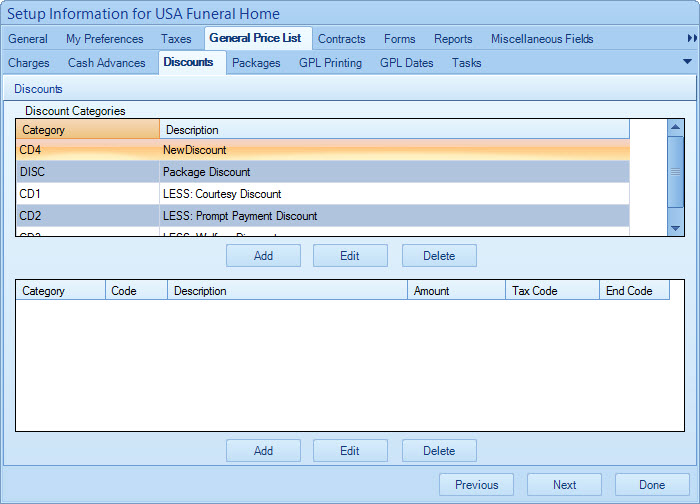
Discount Categories - Each category added in the top grid may have multiple master discounts inside of it.
Master Discounts - Master discounts are simply individual types of discounts the funeral home or cemetery may offer to a customer.
Add New Discount Category:
1) Click the Add button below the Discount Categories grid.
2) Enter a Category for the new category you're adding. This is used to simply group discounts into categories for organization purposes.
3) Enter a Description for the new category (Description is the displayed name of the category for forms).
4) Enter a Sort Order Num if you wish this category to sort in a particular order. The number is ordered relative to other category numbers. This field is optional.
5) Choose Merchandise Category if you wish for this category to be grouped under the merchandise section of invoices and forms. Typically this option is used for small merchandise Charges such as register books, prayer cards, etc., it is not recommended for discount items.
6) Click the OK button to add the discount.
Edit Discount Category:
1) Click the Edit button below the Discount Categories grid.
2) Change the Category field, the Description field, the Sort Order Num field or the Merchandise Category field as desired. Please note that it is not recommended to change the Category field for a category if you already have Master Discounts within the category. Doing so will alienate the master discounts and they will not be editable. Instead, create a new category, then edit each discount, change its category to the newly created category, then delete the now empty old category.
3) Click the OK button to save your changes.
Delete Discount Category:
Please note that it is not recommended to delete a category that has master discounts associated with it, as doing so will alienate the items and they will not be editable. Delete all master discount items within the category first, then proceed with deleting the category.
1) Left-Click once to highlight a category in the Discount Categories grid.
2) Click the Delete button below the Discount Categories grid.
3) Click the Yes button to confirm the delete.
Add New Master Discount:
1) Click the Add button below the Master Discounts grid.
2) Choose a Category to associate your new discount to.
3) Enter a Code number (may be letters too) for the discount. Usually a three-letter abbreviation is used.
4) Enter an Amount for the discount (You may enter this as a positive number). Simply leave the amount at 0.00 if the discount amount is always different.
5) Choose a Tax Code for the item. This is the default tax that is applied to the discount. It can be edited on a case-by-case basis later once attached to a case.
6) Place a check in the Put In Additional Items List option if you would like this discount to be able to be added 'a la carte' to a funeral (as opposed to being a package only discount). By default it is turned on (Recommended).
7) Place a check in the Include on General Price List option if you would like this discount to appear as part of the general price list when printed out on paper. By default it is turned on (Recommended).
8) Place a check in the Print on Contract for All Funerals option if you would like this discount to appear on a formal contract for all cases even if it is a zero amount for the case.
9) Type a Price List Description / Disclosure if you need to explain the discount (often used for a price list printout).
10) Click the OK button to add the cash advance.
Edit Master Discount:
Please note that you should not change the category or code of a discount if it has already been attached to a package. The program will not be able to update the packages automatically. Therefore you will have to edit the packages manually to include your newly categorized or coded discount.
1) Click the Edit button below the Discounts grid.
2) Change the fields that you wish to alter.
3) Click the OK button to save your changes.
4) On the Mortware GPL window, click the Yes button to cascade your changes into all packages that include this discount automatically, click the No button if you would like to leave packages untouched.
Delete Master Discount:
Please note that deleting a master discount will not remove it from packages that contain the item.
1) Left-Click once on the Master Discount that you wish to delete.
2) Click the Delete button below the Discounts grid.
3) Click Yes to confirm the delete.
PACKAGES (TAB)
Packages - Each package in the top grid may have multiple Invoice Lines as part of it. In the above picture example, the Adult Traditional package currently has Organist Services, Certified Copies, Flowers, Death Notice, Register Books, Embalming, Cosmetology... all as part of its package.
Invoice Lines - The invoice lines are items (that have been previously set up in the Master Charges, Cash Advances, or Discounts list) that have been chosen to be part of the currently selected package.
Package Total -
This shows the current total of all the current package's invoice lines.
Add New Package (Package Type):
1) Click the Add button under the Packages grid.
2) Enter a Description for the new package (Description is the displayed name of the package for use on forms).
3) Enter any Notes if you wish to add a paragraph about the package itself. These notes can be displayed on your price list printout.
4) Place a check in the Include on General Price List option if you would like this package to appear as part of the general price list when printed out on paper. By default it is turned on (Recommended).
5)
Choose a package from the Add Details from another package drop-down box if you would like to start the package off with items from a package you have already created.
6) Choose a template from the Field Invisibility Template drop-down box if you would like to set a specific template to this particular package.
7)
Enter a Sorting Order if you would like to put this package in a particular sequence for your General Price List printout.
8) Click the OK button to add the package.
Edit Package:
1) Click the Edit button below the Discounts grid.
2) Change the fields that you wish to alter.
3) Click the OK button to save your changes.
Delete Package:
1) Click to highlight the package you wish to delete in the Packages grid.
2) Click the Delete button below the Packages grid.
3) Click Yes to confirm the delete.
GPL PRINTING (TAB)
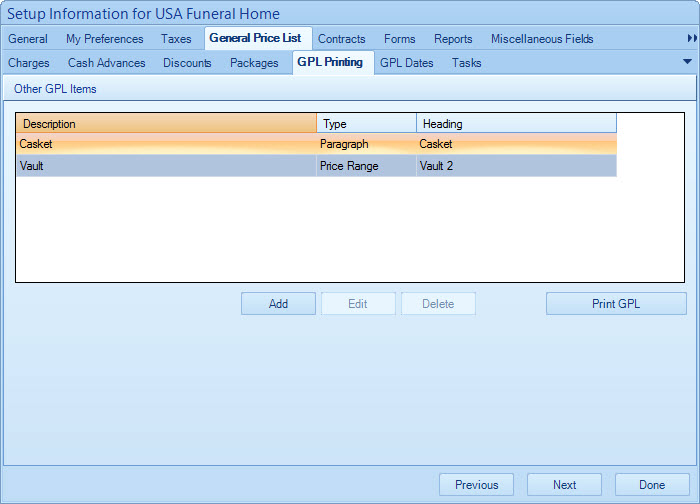
Other GPL Items - This area allows a user to add other items not included in Charges, Cash Advances, and Discounts to the General Price List.
Print GPL - (Print General Price List) Allows the user to print out the current general price list onto paper.
Add Other GPL Items:
1) Click the Add button below the Other GPL Items grid.
2) Enter a Description for your item. Just describes the item for the Other GPL Items grid.
3) Choose between Paragraph or Price Range for the Type for your item. Paragraph lets you type a paragraph below for the item. Price Range is a two-line item that usually comes before or after a section of charges.
4) Enter a Heading for your item description. This heading prints on the General Price List printout.
5) Choose an Alignment from the drop-down box. This specifies the text alignment of the item on the General Price List printout.
6) Choose a Position from the drop-down box. This determines the placement of the item on the printout.
7) Choose a charge category from the of Category drop-down box. According to what you chose in step six, this will place the item before or after the selected category.
8) Enter in detail in the Text for your item. This details the item. If you chose Paragraph in step three, this is where you would enter the paragraph of text.
9) Click the OK button to finish adding your item.
Edit Other GPL Items:
1) Click the Edit button below the Other GPL Items grid.
2) Edit the fields you wish to adjust for the item.
3) Click the OK button to save your changes.
Delete Other GPL Items:
1) Click to highlight the item you wish to delete from the Other GPL Items grid.
2) Click the Delete button below the Other GPL Items grid.
3) Click Yes to confirm the delete.
Print the General Price List:
1) Click the Print GPL button below the Other GPL Items grid.
2) In the General Price List Report window, you may choose your desired options for the printout.
3) Click the Print or Preview
GPL DATES (TAB)
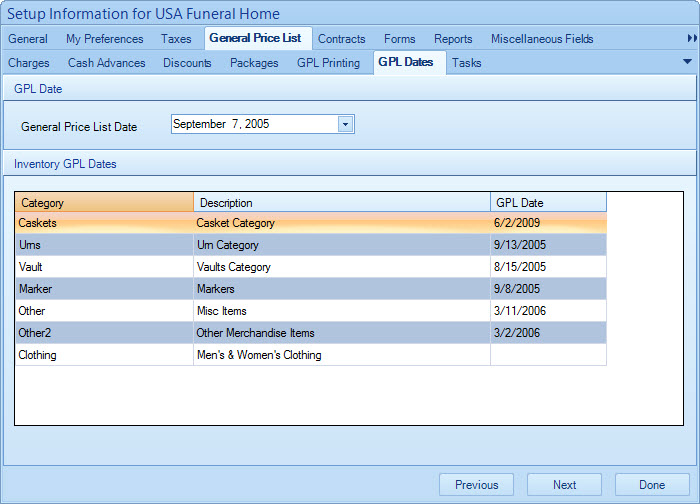
General Price List Date: This date is for the pricelist as a whole (or the date of charges and cash advances).
Inventory GPL Dates: You may set the date for each inventory category in Mortware. Click on the date under the GPLDate column to bring up the date calendar selector.
TASKS (TAB)
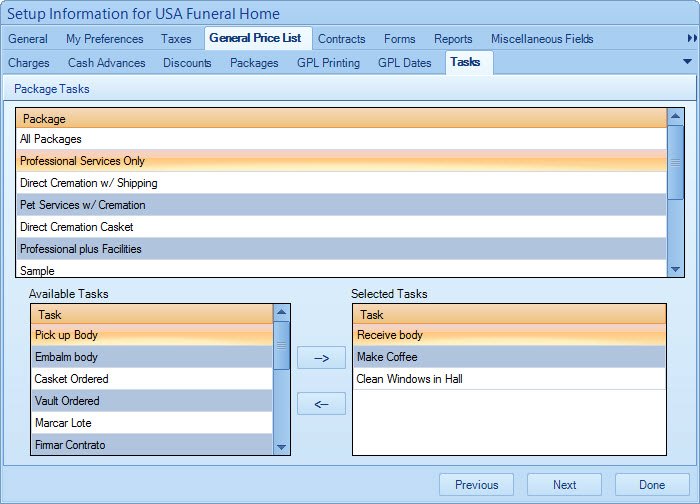
About Package Tasks: If a funeral package has a task attached to it, when a case is created with that package, the Events tab will automatically be filled with the tasks by default. Please note that you can still edit or delete those tasks from the case entry screen.
Package Tasks: This grid shows each package you have set up on the Packages tab will be available to attach tasks to by default.
Available Tasks: This grid shows each task that you have set up on the Task Setup window will be available to attach to a package by default.
Selected Tasks: This grid shows you the tasks that are attached to the currently highlighted package in the Package Tasks grid up above.
How to Attach a Task to a Package (by default): 1) Highlight the package in the upper Package Tasks grid. 2) Highlight an available task in the lower left grid. 3) Click the --> (Right) arrow button. 4) If done correctly, the available task will move to the Selected Tasks grid on the lower right.
How to Remove a Task from a Package: 1) Highlight the package in the upper Package Tasks grid. 2) Highlight the task to remove in the Selected Tasks grid. 3) Click the <-- (Left) arrow button. 4) If done correctly, the selected task will move to the Available Tasks grid on the lower left.

