TABLE OF CONTENTS - USER MAINTENANCE
Topics in this Section:
Add User - Setting Permissions - Add Employee or Director - Add Group - Delete User or Group
Getting to User Maintenance Setup:
Click on "Setup" on the main menu. Choose "User-Maintenance" from the Setup menu that drops down. (Picture)
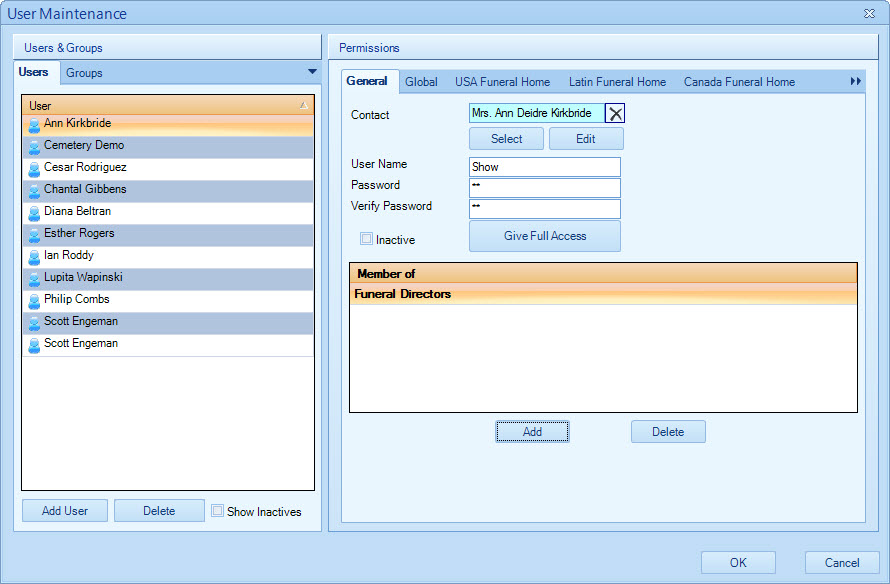
After selecting user-maintenance, you should be looking at a screen similar to this:

On the left side of the screen, you will see a list of users and groups. On the right, you have the permissions and login information for the current user that is highlighted on the left side.
ADDING A USER
- To add a new user, start by clicking the "Add User" button at the bottom left. This will clear the "Contact", User Name, and Password fields.
- Start adding your user by hitting the "Select" button to choose a contact from your database.
- You can search for and find the employee or director you're adding by typing in their last name at the top right. (See Picture)
- If the employee or director is NOT in the database yet, you may add them by clicking "Add Contact" at the bottom left of the screen. This will bring up the "New Contact" window. (See Adding an Employee or Director for your next steps.)
- Highlight the staff member you intend to add, then hit the "Select" button.
- Type in a User Name for the user. (Note: User Name cannot have any spaces in it.)
- Type in the Password for the user. Re-type that password in the "Verify Password" box too.
Setting Permissions:
- Click the "Give Full Access" button if you wish to grant complete permission for the user (Essentially, this will put a checkmark in all permission areas).
- If you wish to specify only some permissions for a user, click through the tabs at the top and turn on permissions as desired for the user.
- On the "Global" tab, you'll be able to put checkmarks beside global permission topics. (See Picture)
- From the Funeral Chapel tabs, you'll be able to be a little more specific than the Global tab. (See Picture)
- The final permission tab is for "Inventory" permissions. (See Picture)
- Once you've gone through and turned on the desired permissions, you can finish by clicking the "OK" button at the bottom.
ADDING AN EMPLOYEE OR DIRECTOR
- From the "New Contact" window, you may start entering in details such as the name and address as per usual for any contact.
- To distinguish the new contact as an employee or funeral director, you need to first click on the "License" tab near the bottom left.
- On the license tab, just place a checkmark beside the role you're looking to designate the user as (You may check on more than one role).
- Click the "OK" button when done.
ADDING A GROUP
Groups are used to lump sets of users together so that they share the permissions of the group. That is, if a user is in a group, they will inherit the group's permissions, and their own will be overwritten. The main benefit of using groups is so that you will then only have to set the permissions once (for the whole group), instead of setting permissions for, say, seven users. Each individual user will still have their own user name and password when logging into the program, but will have the permissions of the group.
To add a group for users, first add individual users, but you may leave them with no permissions set. (See Adding a User for help on this)
- Click the "Add Group" button at the bottom left.
- On the top right, type in a "Group Name" for the group. (For example: "Funeral Directors" if you're grouping director users.)
- Below the "Members" box at the bottom right, click "Add", highlight the first member of your group, then click "Select". That will add a user to your group.
- Repeat step three as many times as needed to include all of your group members.
- Continue through the "Permission" tabs at the top to set the desired permissions for the group. (See Setting Permissions for help on this)
DELETING A USER OR GROUP
- From the Setup Maintenance screen, highlight the user or group that needs to be removed.
- Click on the "Delete" button near the bottom left corner.
- Click "Yes" to confirm the delete.
